Wednesday, 25 May 2011

24/05/2011 wall framing


today we had our usual tool box talk, richard went over the hazards etc, we all worked as one to help richards group finish of doing there floor, then me and a couple of the boys went to help marty measure out where the walls were going to go, used the sting line to help us find where exactly to put our wall frames, and used and straight edge and pencil to mark it out, all the wall frames were already made, pre nailed, after break, the boys grabbed our wall frames, each wall had a number so we know where to take it, we stood up one corner, nailed the bottom plate to the flooring using think it was 100mm flat heads galvanized nails, and the straight edge to make it straight, we grabbed another frame put it against the first frame then clamped them together so it wont move, then damian went and nailed  both top plate walls together so it wont move, then we nailed the whole wall together, we did that through out the whole day, putting up the walls, bracing them together clamping the nailing them, after that me and piula went to check all the corners of the house, seeing if they are all straight using the straight edge, had a quiet few bows in it but fixed most of them up, it started looking like a house which was good.. churr

23/05/2011 flooring


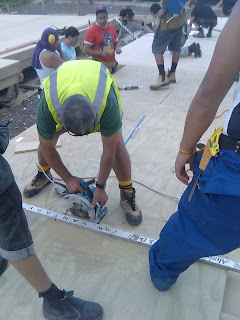
today we nearly finished of the flooring, we hammered and nailed in some parts of the flooringg, measuring and cutting the boards to size to fit into our left over gaps, while me and mike we cutting out pieces from the plywood to lay out than glue and nail it, we cut it using the skill saw, later on the day we finished doing the whole floor, putting on all the flooring including the ply, it looked good, had some gaps in between the boards but fixed it up using the glue :) , gave it a sweep and then marty marked out where the wall's were going to go,

17/05/2011 continue frm yestrdayy

we continued on from yestrdayy, still doing laying out the foil, cutting out gaps fr the glue and hammering down the particle boards, it will probably be the same thing this whole week?

16/05/2011 flooring


today we started on the flooring, finally we can walk on the house, we started out by nailing on the cleats from the joist to the bearers, so when the house gets picked up, the bearers will go with it, then we layed out the foil, with an 100mm sagg in the middle all the way, stapled it using the gun stapler, then cut in four rectangular shapes for the glue to go on, but first we marked out 100mm in the middle so we can put on the particle boards, buh i kinda effed it up by measuring it wrong, marty measured 100mm while i measured 105mm, we put the particle board on top of the foil glued it down using gorilla grip glue, than nailed it all down to the joist, both ends of the particle boards the spacing of each nail was meant to be 150mm, we nailed it down and in the middle was 200mm. but back to the 105mm that was wrong, it ended up going out 150mm off,, which was a huge eff up. we managed to put on some of the particle boards, kept on running the foil through and putting on glue, we used the plywood for where the showers will go and the toilets. pictures of us laying down the foil, hammering on the particle board on to the joist, glueing etc..

10/05/2011 carried on with nogging


today was a whole day of practical.. better, dont like theory, team marty was carring on with nogging, and half of th boiz wnt on to do the nail plates, there were two plates used, one of them was nailed into the bearers, which will overlap a or a joint where it is laminated, and the other one was nailed onto the joist which was nailed on to the middle bearer.

09/05/2011 nogging

today at the site, we split into the usual groups, team marty's nd team richard's, i was with richard's group again putting on the last of the floor joist, putting them in thea place and nailing them in, after that they measured out pieces of timber for nogging, while i went with marty and grabed the dumpy level, set it up then used a piece of timber at the staff, we went and checked every height of the house, some parts of the house was lower than the other, so we removed the jack stud that was wrong and put up a new one which adjusted the height of the house abit, we went around checking it all, and found that some heights in the corner and the middle of the house was of so we removed some jack studs and out new jack studs to adjust the height, we did it till our floor was all at the right height and it was..

04/05/2011 joist


 today we carried on with the same thing as yestrday. we laminated the last bearer using 100mm galvanised nails, we kept one side as the flush side then nailed it, we fixed it on to the jack stud then nailed it all in, then we used some timber which i think it ws 2x4's?? for the trusses which will help support the bearers which are on the jack studs from moving, we nailed one side onto the jack stud and nailed the other side on to the jack stud that was in the middle, we then marked out where each joist will go which will sit up on top of the bearers, we calculated how much timber that we were going to use for the joist and it was quite alot, we measured them and cut them down to size, we fixed them on the mark that they were suppose to be on, we nailed it on to the bearers, we did one side of joist first, nailed it to the bearers, we did it form one side of the bearers to where the middle bearer was, than did the same on the other side, when we fixed th joist on we stood it up on its side and nailed it on an angle. these pictures shows where the joist went, what tools we used to cut our timber etc..

Tuesday, 24 May 2011

02/05/2011 back to the site

we were in class for 2periods going over our first assignment which was buit 4540, telling us how we went, and how can we improve on it, i passed which was a good result, and then we went over buit 4542, what parts of the assignment we neede to work on which was calcs, after those two periods, we went down to the site, i worked with richards class, we were marking out where each joist will go, how far the spacing between each joist.

12/04/2011 work site

we carried on from yesterdayy, but this time we were marking out where the jack studs go, i measured the timber that was going to be used for the jack stud, cut them to the length of how high the string line was, which was our ffl, the spacing between each jack studs was 800mm, then nailed them in place, we then got two pieces of timber for the bearers, measure two of them of the same size then laminated them, nailing them on and angle so it wont go through the timber, the bearers will go on top of the jack studs which will determine the length of the FINISH FLOOR LEVEL

Sunday, 22 May 2011

11/4/2011 / work site/ profiling

today was the first day we went on site, checking out where we wer goin to work at, having a talk with th whole class on what was going to be done here every week, we started by clearing th site, taking all th scarp pieces of timber and throwing it away, taking out nails of timber, and disposing of the rubbish, cleaned up th site, we then grabbed the dumpy levels which is used for finding heights, and used it to mark the corners of the house, and where it ws goin to be, we then positioned the pegs to mark as the corner of our house, set up our batter boards and used the string line to position where the house was going to be and the shape of the house at its finish floor level height.